Bender Tutorial: How to Travel by Map
Project Type: Animation
Software: Blender 2.72b
OS: Mac OSX 10.10.5
This is based on a project by David Mcsween. You should check out his video.
This is a tutorial on how to animate red dots to travel across a map. You can use any hi-res image of a map.
Here's a 4 minute screen cast. There's no sounds after the music.
Get the Map Into You're scene
Right Click on the Default Cube and press the X key to delete it.
Delete the default cube
Go to the File menu and choose Import > Images as Planes. Navigate to the map image you want to use and Import it.
Import Images as plane
You'll see a flat grey plane in the scene but there's no map on it. Click on Viewport Shading and change the setting to Material.
Change the Viewport Shading option to Material
The plane will now show the image of your map.
Material Shading
Make the dotted path
Press Shift + A to pull up the add menu. Choose Curve > Path.
Add a Path
Change the path's name to anything you want. I named mine Dots Path. This is the path I will use for the red dots to follow.
Rename the path
Super Important: Do Not Change The Location, Rotation or Scale of the Path in Object Mode. Only make changes to the Path in Edit Mode. Changing the path in Object Mode will wreak havoc with your animation.
With the Path selected, press TAB to enter Edit Mode. The path will change into a series of arrows indicating the direction. More on this later.
Path in Edit Mode
Press TAB to go back into Object Mode. Right click on the map to select it. Press S and use the mouse to scale up the map a little.
Scale Map
Right click on the path again. TAB into edit mode and edit the path by moving the points around. Just click on the points and press G (grab) to manipulate the path. I edited mine to jump from Oklahoma to Illinois then to Florida.
Edit the Path
TAB back into Object Mode. Press Shift + A to add a plane. This will be the red dots for the animation.
Add Plane
Super Important: Do Not Change The Location, Rotation or Scale of the this plane in Object Mode. Only make changes to this Plane in Edit Mode. Changing the plane in Object Mode will wreak havoc with your animation.
TAB into Edit Mode and press S to scale down the plane.
Scale the Plane in Edit Mode
Click on the wrench icon on the menu to the right and add an Array Modifier.
Add an Array Modifier
You'll notice right away that the plane has been duplicated but the copy is sitting right next to the original.
Increase the relative offset on the X - Axis to put a little space between the planes.
Set the relative offset
Now click on the icon that looks like a ball then click on New to create a new Material for the plane.
Make a new Material
Change the color to red and now you'll have the red dots for the animation.
Change Color to Red
Now add a Curve Modifier.
Curve Modifier
Choose the Dots Path as the Object
Select Curve
TAB back into Object Mode and you'll see the red dots snap to the Path.
The Planes Snap to Path
Now adjusting the Count of the Array Modifier will increase the number of dots. Go to the beginning of the animation, set the count to 0 and hover the cursor over the count and press I to insert a key frame.
Go to the end of the animation, adjust the count so that the dots reach the end of the path and press I to add another key frame there.
Increase the array count
Time to Animate the Camera
Press Shift + A to add another Path.
Add another path
Rename it. I named mine Camera Path.
Rename to Camera Path
TAB into Edit Mode and edit the path any way you like.

TAB back into Object Mode then Right click on the camera. The current setting of the Camera are going to interfere with our animation. Clear the Location and Rotation of the Camera by pressing ALT+G then ALT+R respectively.
Now let's get the Camera to move along the path. With the Camera selected, click on the chain icon and add the Follow Camera Object Constraint. Choose the Camera Path as the Target and press the Animate button.
Follow Path Constraint
The Camera with snap to and travel along the path but it is pointing straight down.
The camera follows the path
Pointing the Camera
Press Shift + A to add and Empty and choose the Sphere shape.
Add Empty Sphere
I renamed mine Camera Target.
Change the empty name to Camera Target
With the Camera selected and a Track to Constraint.
Track To Constraint
Choose the Camera Target as the Target.
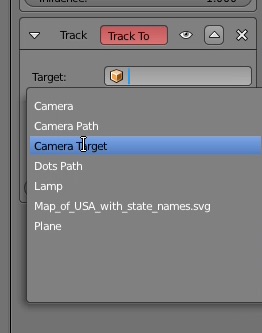
Select the Camera Target
The Camera will be pointing in a weird direction so you'll need to change the "To" setting to -Z and change the "Up" setting to Y. I don't know why these setting make the Track To Constraint work.
Track to Settings
Camera tracks to the Camera Target Empty
Now just key frame the Camera Target location anywhere you want to control the Camera.
Red Circles
The red circles are just circle curves. I key frames their scale as needed
That's it! Find yourself a hi-res map image and get started.