
Make a Weather Radio with a Raspberry Pi 3
*Please note: This post was made in 2016. The links to AIW Industries are no longer functioning. The Si4707 may have been retired.
Back in May, I put together a weather radio with an Adruino Uno and a AIW Industries Si4707 breakout board (see the Arduino Weather Project here). Since then, AIW Industries has put out an NWR Receiver/SAME Decoder HAT (Hardware Attached on Top).
I chose to pair the HAT with a Raspberry Pi 3 because of the built in wi-fi, that way I could ssh into the the Pi without an extra wi-fi dongle.
Details
The HAT is a radio receiver that can be tuned to NOAA Weather Broadcasts and decode Specific Area Message Encoding (SAME). Theoretically, I should be able to program the Pi to react anyway I want once it receives and decodes the 1050 Hz warning alarm tone.
Issues
The HAT fits onto the GPIO pins without a problem but it does have a couple of drawback.
First, there is no structural support for the board.
I recommend getting the Acrylic Case w/Standoff Kit to prevent damage to either the Raspberry Pi or the HAT.
The second issue is you cannot stack another HAT or a Pi Cobbler Kit on top of the board, so I'll need to find a work around if I want to breadboard additional components like LEDs or buttons.
AIW Industries provided the instructions for setting up NWR Receiver/SAME Decoder HAT on their website.
Things not Included in the instructions on the AIW Industries Website
Since the board is a radio receiver, it will be necessary to set the broadcast frequency within the code. Just open the file with nano.
cd /home/pi/Pi_4707/firmware
sudo nano NWRSAME_v2.py

Find the line radio.tuneDirect(162550) then replace the preset frequency with the frequency of the station closest to you.
You can look up the NOAA broadcast station closest to you at http://www.nws.noaa.gov/nwr/coverage/station_listing.html

The AIW website instructs you ssh into the Raspberry Pi and run the lines
cd /home/pi/Pi_4707/firmware
sudo python NWRSAME_v2.py
I immediately got this error
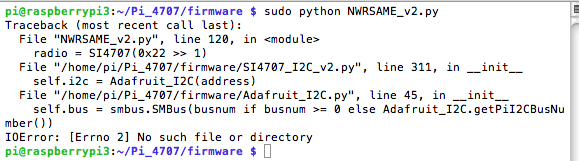
This happened because I2C needed to be enabled on the Raspberry Pi.
Run raspi-config to get to this setting. Enable I2C then reboot the Raspberry Pi.

Run the NWRSAME_v2.py file again. The terminal screen should print out the menu. Simply type the letter and hit enter to execute the command and you should hear the weather broadcast from the NWR reciever's built in speaker.
Fixing Mistakes in the Code
There are instructions in the code to uncomment a line for the RSQ Interrupt Sources

I immediately received an error when I ran the code.

It turns out there are a couple mistakes in that line of code. There should be an extra parenthesis at the end of the line.
Radio.setProperty should have a lower case "r" so it reads radio.setProperty

That's about it. I'm up and running with the Pi as a weather radio. I just need to study the code and figure out what I can do to customize my setup